Sunday, May 31, 2015

Brooks - Albertson Wedding


On Saturday, September 21st, 2013, my daughter, Sarah Brooks, 
married her sweetheart, 
Steven Albertson, in our garden. 


They said their vows under a trellis twined with roses, morning glory & moonflowers


Mint green with peach were the Bride's colors. 


Smooch!


After the ceremony, guests blew bubbles then showered the newlyweds with candy sprinkles


You can just make out the rainbow hues of candy sprinkles, like confetti on the ground


Vintage Touches:


 Vintage suitcases, one painted in the Bride's fav mint green, are stacked on a quaint old wooden piano bench and hold the wedding programs and fans, a must-have for summer weddings.


One side of the program fans told the their 'Love Story' and the other side was printed with a fun 'I Spy' game.  Another easy DIY !


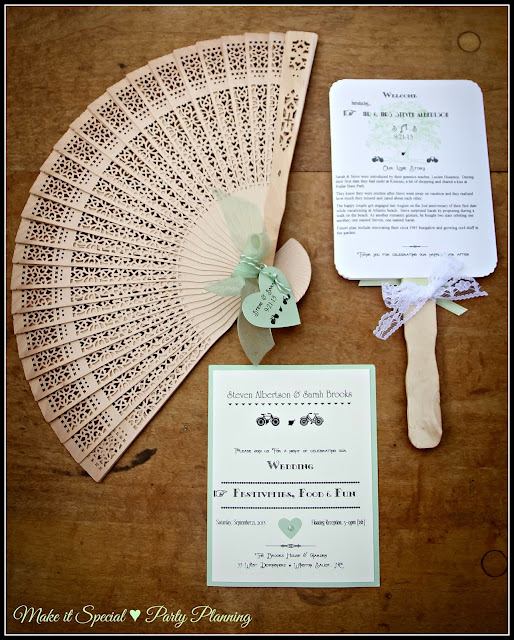
Closeup of the co-ordinating invitation, program fans which we designed, printed & assembled ourselves.


An old drop leaf table holds the guest sign in book 
along with an antique typewriter that invites guests to leave their 
"Words of Wisdom - Advice for the Bride & Groom" 
and a little chest to keep the candy sprinkles to be thrown after the ceremony.


Garden Party Decor:


We rented chairs, tables and tents to accommodate our guests and went to work creating this 
magical party look 
with all the charming paper lanterns, parasols and twinkling lights.


We had the whole family working together the evening before to set up.


I ordered most of the paper lanterns & parasols off the internet.


Flowers are arranged in a mix of glass vases, mason jars & vintage bottles.


We bought the lanterns from Ikea and salvaged the wood slices from tree debris 
creating an interesting Woodland theme.


Each table had a delightful vignette consisting of different sizes of lanterns, the same types of flowers but arranged in an array of collected vases, vintage glass bottles, mason jars and slices of trees.  Finishing touches were the little terra cotta pots filled with succulents. 
I Love the look, it's casual but elegant!


So many cool photos it was a hard to pick which ones to post!


It was an incredible night!
Gazing around at all the details contributed to the overall breathtaking effect.


Coming up
Part Two
The Wedding Food

&
DIY Wedding & Bridal Tips


Photos of the Bride & Groom

All the evening photos were taken by Sarah Albertson, 
check out her delightful blog, 
to see more of her outstanding photographs!!


Saturday, February 21, 2015

Vintage Valentines & a Birthday Breakfast

Over the years I've saved and collected some wonderful handmade, 
vintage Valentines and heart shape candy boxes.


This year I decided to venture up into the attic and bring down those 
relics from my past life.  
And scatter them throughout the house.


It's fun to create these holiday themed vignettes around the house.  
Every time I walk past it brightens my day, makes me smile


In the dining room I set up this display switching out my Christmas decorations for Valentines.  I love using an old wood box and soda crate as a shelves for collectibles.


I got this lovely tattered vintage valentine candy heart box from my sweetheart long ago.  Can't help but wonder about the original giver and receiver of such and unusual valentine.  It's made of cardboard and the glue has disappeared with age but I still think it might be my favorite.  
The spiderwebs are cool and give it an air of mystery, don't you think?


Here's another vintage valentine from my collection and a metal candy heart box.


I like to gussy up this old cupboard in my kitchen with vintage holiday themed collectibles sprinkled in with my favorite Jadite and McCoy pottery pieces.


Glass apothecary jars are filled with pretty candies in Valentine shades of red and pink.  

There's red licorice, coral pink heart shaped Runts, 
Jelly bean hearts and gummy kissy lips!


My very Favorite chocolate is Godiva and over the years I've 'collected' so many pretty heart shaped boxes.  Every year there's a new design, you see, and they are all so lovely.  I thought the old packaging on the birthday candles was very cute and went with the valentine theme especially with that little heart on it that says .10 cents.  
Can you believe there was a time when birthday candles were only .10?!
The fella & gal are vintage plastic candy containers.


I have this extra large window in my kitchen over the sink 
that looks out onto some trees and backyards. 
It's a good place to hang suncatchers and my goofy windchime made out of silverware.  
I display some pretty Depression glassware on the window ledge.


Here's a closeup of one side of the little shelves my hubby built on either side of the window.  They are just the right size for spice shakers.


This photo shows the other side of the window.

I'm glad I decided to get the old Valentines down from the attic.  It was nice to see them again and they certainly brightened up the house during 
this very seriously cold winter here in North Carolina.


My firstborn daughter's birthday is a week before Valentine's day and she requested 
a birthday breakfast this year.  
I was happy to oblige, baking her favorite muffins, 
Cappuccino Chocolate Chip 
and having them ready fresh out of the oven for her arrival 
so the chocolate chips are still warm and gooey.

It looks like my kitty cat, Sookie approves.


I made little fruit cups using fresh mango, strawberries, blueberries and starfruit.  
I think fresh fruit for breakfast is the BEST.


I made scrambled eggs with chopped green onions, 
fresh organic baby spinach, 
dried basil, cheddar cheese
and served with sauteed mushrooms.  
We sipped mimosas and nibbled our breakfast treats while she opened all of her presents


Here is the recipe for the Cappuccino Chocolate Chip Muffins.  
I found it years ago, in Country Living magazine's October 1993 issue and they've been a family favorite ever since because that are so good, dense and cakey.


Ingredients:

1 1/2 teaspoons baking powder
1/2 teaspoon salt
1 3/4 cup unsifted all-purpose flour
6 T. butter, softened
2/3 cup sugar
1 teaspoon vanilla extract
1 large egg
2 T. Instant espresso - I used 2 packets dissolved in 2 T. hot water
2 T. coffee flavored liquor (optional)
1/4 cup milk
3/4 cup chocolate chips

Directions:

Heat oven to 375 degrees. Grease or paper muffin pan. Usually makes 9-10 muffins.

In medium bowl, sift or whisk flour, baking powder and salt, set aside.

In large bowl, beat on medium speed: butter and sugar till light and fluffy. 
Beat in egg and vanilla.

Dissolve instant espresso by stirring into 2 T. hot water.  Then add milk & optional coffee liquor until blended.

Add flour mixture to butter mixture alternating with espresso beating just until combined. 

Fold in chocolate chips. Divide batter among muffin-pan cups.  I always sprinkle muffins with a bit of Turbinado sugar mixed with cinnamon

Bake 25-30 minutes or until centers spring back when lightly pressed. Serve warm so the chocolate chips are melted.


Hope you give them a try!


Sunday, February 1, 2015

Vintage Christmas Collections - Highlights of My Christmas 2014 Decorating - Part 2

We have this gorgeous antique secretary in the parlor that I've been crazy about since we brought it home with us to NC years ago. It has a roll top, nifty little pigeonhole slots and it belonged to my husband's mother.  This year I decided to decorate it for Halloween and Christmas using our collection of vintage holiday stuff.  I really like the way it turned out!


It's situated in a pretty dark corner so I decided to add a strand of sparkling lights as well as some light up plastic blow molds.


I'm always fascinated by the interesting graphics on vintage packaging and tins, like the pocket tobacco tins that are tucked into a few of the pigeonholes, and all the Christmas lights and ornament  boxes.


I know this photo is kind of redundant but I like the lighting, especially in the cabinet.


Here's a closeup of all the vintage goodies on the bottom and middle shelves with the doors open.  It's just filled with charming collectibles.


The vintage stuff on the top shelf in the background from left to right is a children's book, a box of Swedish angel chimes and a box of unused cards.  The vintage boxes on the middle shelf are both light sets and in the middle is a game where you snag the ring on Santa's mustache.


Not the best photo but it shows the cute box details.  
Don't you LOVE the silver glitter on the reindeer antlers?  


A couple more closeups to show the detail of the spiffy graphics.  I especially like the box details of the Diamond Ray Jeweled Icicles.


A part of me yearns to keep these Christmas cuties up all year.
I'm tempted to do just that because I don't have so many vintage Valentine decorations but I do have a fair amount of vintage plastic bunny rabbits tucked away somewhere in the attic!
They might look interesting grouped together inside this cabinet.

Tuesday, January 20, 2015

Highlights of My Christmas 2014 Decorating

One of my first and favorite things to decorate for the Christmas are the shelves on the cupboard in my kitchen. 


I keep some of my favorite Jadite and McCoy pieces displayed on it all through the year and just add cute candies, vintage collectibles and seasonal whatnots to it.


I adore the vintage pink McCoy kittycat cookie jar especially with the touches of Christmas red.


On my birthday I was shopping at World Market and spied that terrific pink velvet-y deer on sale, 2 for $5!  So I bought them and casually set one there on the shelf and thought it looked perfect next to the holiday candies.


The other pink deer ended up on the bookshelves in the hall


That silver sleigh with the reindeer is one of very favorite things!


I set up part of my vintage blow mold collection on an antique buffet we have in the dining room that I have set up as a bar.  I like the way all the nifty bottles look with some of my vintage glassware.  Cocktail anyone?


Don't these bottle brush trees look cute in the window?


I'm crazy about vintage stuff, especially the graphics on the boxes.  I've been toying with using vintage boxes as a design element for a few years.  The challenge is getting just the right amount of interesting stuff in your display without looking cluttered and too messy.


Sometimes I like the box better than what's inside!
For instance, my scary Santa collection is rather cluttered and kitchy displayed on a bookshelf in the parlor.  The guy sitting in the back on the left is kinda weird, isn't he? That guy came in the cool green box with the peephole {on the right}.  Then the Santa with the bell shaped skirt? that spins around came from the 'Musical Santa' box.


I display lots of Christmas collectibles on the Kitchen hoosier cupboard.  


Here's a closeup of that vintage box of silver icicles


As I was decorating the tree this year with with all those cherished family heirlooms I started stacking all the empty vintage Shiny Brite boxes on this antique chair in my foyer.  I liked they way it looked so much I decided to leave the boxes out as another kind of decoration.


Here's a preview of another post I'm working on about using my vintage Christmas collectibles and their boxes for a display I made in our antique secretary.   I'm thrilled with the way I've decorated it this year.  It looks knock your socks of amazing!  But I'm not happy with the photos I took at all.  My camera is vexing me and being very temperamental.


 This photo isn't bad, except for the glass refection.


Most of the photos in this post were taken by my Lovely daughter, Sarah.  
Thank you for helping me, Dearie!  

Visit her blog, Lostvestige for more of her wonderful photos.